之前有拿Wordpress搭建过博客,感觉还是太臃肿了,Hexo这种静态博客刚好满足我的需求,记录下折腾博客的过程。
前期准备
在云服务商处购买服务器与域名,备案的时候需要服务器,如果打算将博客托管在对象存储或者github pages之类的平台,可以选择不购买服务器,直接到*宝购买服务号即可。
Hexo
Hexo 的安装
- 安装node.js
使用 Node.js 官方安装程序时,请确保勾选 Add to PATH 选项(默认已勾选)
- 安装hexo
1 | npm install hexo-cli -g |
修改配置
打开
_config.yml,修改title、description、author、language、url字段。
安装 next 主题
1 | cd blog |
在_config.yml中将theme字段值设置为next。
配置 next 主题(可选)
配置next主题指的是修改next/_config.yml文件,注意区分。
选择 Scheme
1 | scheme: Muse |
设置头像
1 | avatar: |
添加标签页
新建标签页
1
2$ cd your-hexo-site
$ hexo new page tags修改主题配置文件
1
2
3
4
5
6menu:
home: / || fa fa-home
about: /about/ || fa fa-user
tags: /tags/ || fa fa-tags
categories: /categories/ || fa fa-th
archives: /archives/ || fa fa-archive
添加分类页
新建标签页
1
2$ cd your-hexo-site
$ hexo new page categories修改主题配置文件
1
2
3
4
5
6menu:
home: / || fa fa-home
about: /about/ || fa fa-user
tags: /tags/ || fa fa-tags
categories: /categories/ || fa fa-th
archives: /archives/ || fa fa-archive
侧边栏社交链接
1 | social: |
设置字体
1 | font: |
设置动画效果
1 | use_motion: true # 开启动画效果 |
设置页脚
不显示
Powered by Hexo & NexT信息1
powered: false
添加备案号
1
2
3beian:
enable: true
icp: 京ICP备17073808-2站点建立时间
1
since: 2020
设置版权信息
1 | # Declare license on posts |
加载进度条
安装
pace1
git clone https://github.com/theme-next/theme-next-pace themes/next/source/lib/pace
修改配置文件
1
2
3
4
5
6pace:
enable: true
# Themes list:
# big-counter | bounce | barber-shop | center-atom | center-circle | center-radar | center-simple
# corner-indicator | fill-left | flat-top | flash | loading-bar | mac-osx | material | minimal
theme: minimal
显示当前浏览进度
1 | scrollpercent: true |
搜索功能
1 | local_search: |
百度统计
登录 百度统计,定位到站点的代码获取页面,复制 hm.js? 后面那串统计脚本 id,编辑 主题配置文件, 修改字段 baidu_analytics,值设置成你的百度统计脚本 id
文章阅读次数统计
NexT主题已集成了不蒜子的访客人数和文章阅读统计功能。
修改NexT\_config.yml设置enable为true即可。
1 | busuanzi_count: |
CDN
比较常用的开源项目 CDN 服务商主要有 unpkg、bootcdn、 cdnjs、jsdelivr 和 cloudflare,本站主要使用 jsdelivr 提供的 CDN 加速服务。
评论系统
Hexo+Next添加Valine评论系统 | Z Blog (yueyue200830.github.io)
leanCloud配置域名解决博客valine无法评论问题 | 吴志勇的博客 (wu-zy.com)
博客部署
依赖
- git
- nginx
部署
git服务器
配置钩子
在
/home/git/lsqls/public.git/hooks目录下新建一个post-receive可执行文件,编辑这个文件,写入如下内容:1
2
git --work-tree=/var/www/hexoblog/public --git-dir=/home/git/lsqls/public.git checkout -f- 设置这个文件的可执行权限:
chmod +x post-receive - 更改配置目录的权限:
chown -R git:git /var/www/hexoblog/public/ - 注意,
/var/www/hexoblog/public要换成你自己的部署目录
可以尝试手动执行脚本,验证是否正常工作。
- 设置这个文件的可执行权限:
nginx服务器
1 | cd /etc/nginx/conf.d/ |
blog.conf文件配置,开启缓存。
1 | server { |
编辑nginx.conf,开启gzip
1 | gzip on; |
七牛云
添加账户:
1
qshell account [<AccessKey> <SecretKey> <Name 任意字符串>]
添加储存空间
lbshexoblog,并做一些配置: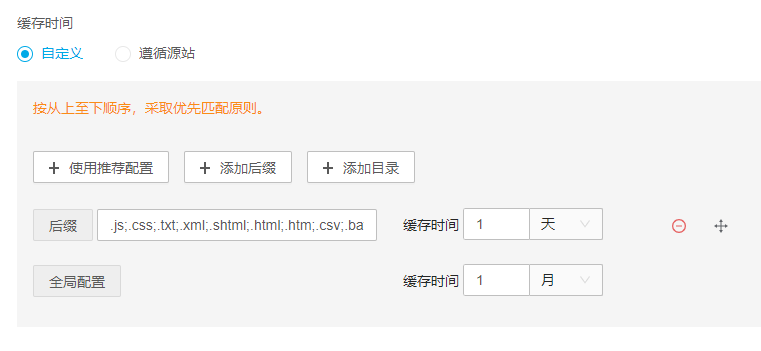
方法一
在
hexo目录配置文件qiniu.conf:1
2
3
4
5
6
7
8
9{
"src_dir": "D:\\hexoblog\\public",
//储存空间名称
"bucket": "lbshexoblog",
//是否覆盖
"overwrite" : true,
//检查新增文件
"rescan_local" : true
}添加CDN刷新文件列表
cdnrefresh.txt:1
https://www.onebug.tech
上传命令:
1
2
3hexo g
qshell qupload qiniuyun.conf
qshell cdnrefresh -i cdnrefresh.txt一键部署,修改
package.json,今后只需要npm run publish就可实现一键打包部署到七牛云1
2
3"scripts":{
"publish": "hexo g && qshell qupload qiniuyun.conf && qshell cdnrefresh -i cdnrefresh.txt"
}
方法二
使用工具qiniu/QSunSync: 七牛云文件同步图形化工具-Windows版本 (github.com)同步。个人更倾向于用该方法。
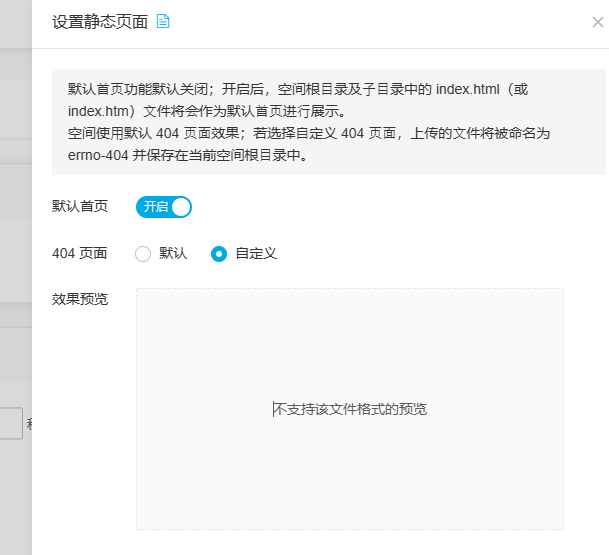
设置404页面
在七牛云存储控制设置静态页面处上传自定义404页面。
图床
图床能够很大程度降低响应延迟,本站使用的是七牛云作为图床。可以参考该文章搭建。
bugfix
中文目录不跳转
hexo更新后遇到中文目录不跳转的问题,修复见fix: Chinese TOC cannot jump。直接替换source/js/utils.js。