JAVA NIO
概述
Java NIO 由以下几个核心部分组成:
- Channels
- Buffers
- Selectors
虽然Java NIO 中除此之外还有很多类和组件,但在我看来,Channel,Buffer 和 Selector 构成了核心的API。其它组件,如Pipe和FileLock,只不过是与三个核心组件共同使用的工具类。
基本上,所有的 IO 在NIO 中都从一个Channel 开始。Channel,国内大多翻译成“通道”,有点像流。 不同的是,数据可以从Channel读到Buffer中,也可以从Buffer 写到Channel中。
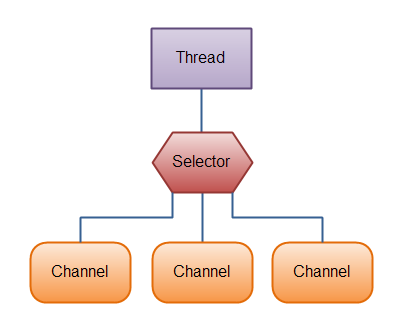
Selector允许单线程处理多个 Channel。如果你的应用打开了多个连接(通道),但每个连接的流量都很低,使用Selector就会很方便。
Buffer
发送给一个通道的所有数据都必须首先放到缓冲区中,同样地,从通道中读取的任何数据都要先读到缓冲区中。也就是说,不会直接对通道进行读写数据,而是要先经过缓冲区。缓冲区本质上是一块可以写入数据,然后可以从中读取数据的内存。这块内存被包装成NIO Buffer对象,并提供了一组方法,用来方便的访问该块内存。
类型
Java NIO 有以下Buffer类型
- ByteBuffer
- MappedByteBuffer
- CharBuffer
- DoubleBuffer
- FloatBuffer
- IntBuffer
- LongBuffer
- ShortBuffer
这些Buffer类型代表了不同的数据类型。换句话说,就是可以通过char,short,int,long,float 或 double类型来操作缓冲区中的字节。
用法
基本用法
使用Buffer读写数据一般遵循以下四个步骤:
写入数据到Buffer
调用
flip()方法,从写模式切换到读模式,在读模式下,可以读取之前写入到buffer的所有数据。从Buffer中读取数据
调用
clear()方法或者compact()方法,清空缓冲区clear()方法会清空整个缓冲区。compact()方法只会清除已经读过的数据。任何未读的数据都被移到缓冲区的起始处,新写入的数据将放到缓冲区未读数据的后面。
Buffer的分配
要想获得一个Buffer对象首先要进行分配。 每一个Buffer类都有一个allocate方法。下面是一个分配48字节capacity的ByteBuffer的例子。
1 | ByteBuffer buf = ByteBuffer.allocate(48); |
向Buffer中写入数据
写数据到Buffer有两种方式:
从Channel写到Buffer。
1
int bytesRead = inChannel.read(buf); //read into buffer.
通过Buffer的put()方法写到Buffer里,put方法有很多版本,允许你以不同的方式把数据写入到Buffer中。例如, 写到一个指定的位置,或者把一个字节数组写入到Buffer。 更多Buffer实现的细节参考JavaDoc。
1
buf.put(127);
读取数据
从Buffer中读取数据有两种方式:
- 从Buffer读取数据到Channel。
1 | //read from buffer into channel. |
- 使用get()方法从Buffer中读取数据,get方法有很多版本,允许你以不同的方式从Buffer中读取数据。例如,从指定position读取,或者从Buffer中读取数据到字节数组。更多Buffer实现的细节参考JavaDoc。
1 | byte aByte = buf.get(); |
原理
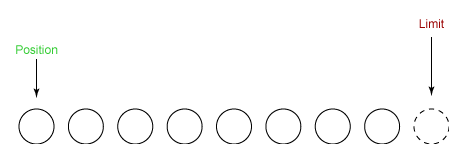
Buffer简单地理解为一组基本数据类型的元素列表,它通过几个变量来保存这个数据的当前位置状态:
| 索引 | 说明 |
|---|---|
| capacity | 缓冲区数组的总长度 |
| position | 下一个要操作的数据元素的位置 |
| limit | 缓冲区数组中不可操作的下一个元素的位置:limit<=capacity |
状态变量的改变过程举例:
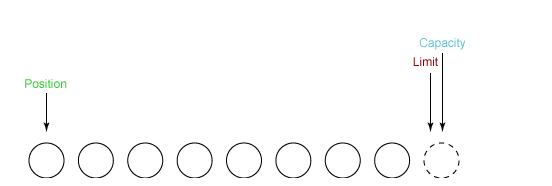
① 通过ByteBuffer.allocate(8)新建一个大小为 8 个字节的缓冲区,此时 position 为 0,而 limit = capacity = 8。capacity 变量不会改变,下面的讨论会忽略它。
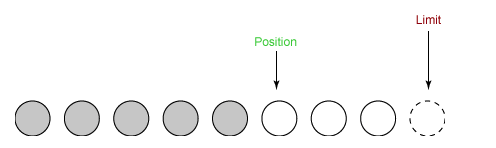
② 从输入通道中读取 5 个字节数据写入缓冲区中,此时 position 为 5,limit 保持不变。
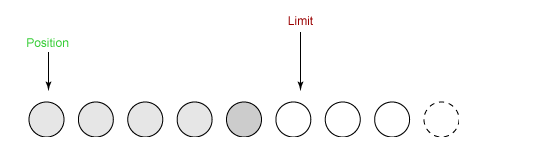
③ 在将缓冲区的数据写到输出通道之前,需要先调用 flip() 方法,这个方法将 limit 设置为当前 position,并将 position 设置为 0。
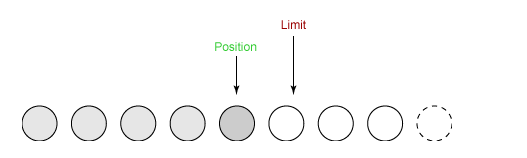
④ 从缓冲区中取 4 个字节到输出缓冲中,此时 position 设为 4。
⑤ 最后需要调用 clear() 方法来清空缓冲区,此时 position 和 limit 都被设置为最初位置。
Channel
Java NIO的通道类似流,但又有些不同:
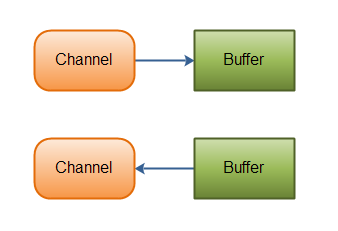
- 既可以从通道中读取数据,又可以写数据到通道。但流的读写通常是单向的。
- 通道可以异步地读写。
- 通道中的数据总是要先读到一个Buffer,或者总是要从一个Buffer中写入。
正如上面所说,从通道读取数据到缓冲区,从缓冲区写入数据到通道。如下图所示:
这些是Java NIO中最重要的通道的实现:
- FileChannel 从文件中读写数据
- DatagramChannel 能通过UDP读写网络中的数据
- SocketChannel 能通过TCP读写网络中的数据
- ServerSocketChannel 可以监听新进来的TCP连接,像Web服务器那样。对每一个新进来的连接都会创建一个SocketChannel
FileChannel
Java NIO中的FileChannel是一个连接到文件的通道。可以通过文件通道读写文件。FileChannel无法设置为非阻塞模式,它总是运行在阻塞模式下。
打开
在使用FileChannel之前,必须先打开它。但是,我们无法直接打开一个FileChannel,需要通过使用一个InputStream、OutputStream或RandomAccessFile来获取一个FileChannel实例。下面是通过RandomAccessFile打开FileChannel的示例:
1 | RandomAccessFile aFile = new RandomAccessFile("data/nio-data.txt", "rw"); |
读取
打开FileChannel后,调用多个read()方法之一从FileChannel中读取数据。如:
1 | ByteBuffer buf = ByteBuffer.allocate(48); |
首先,分配一个Buffer。从FileChannel中读取的数据将被读到Buffer中。然后,调用FileChannel.read()方法。该方法将数据从FileChannel读取到Buffer中。read()方法返回的int值表示了有多少字节被读到了Buffer中。如果返回**-1,表示到了文件末尾**。
写入
使用FileChannel.write()方法向FileChannel写数据,该方法的参数是一个Buffer:
1 | String newData = "New String to write to file..." + System.currentTimeMillis(); |
注意FileChannel.write()是在while循环中调用的。因为无法保证write()方法一次能向FileChannel写入多少字节,因此需要重复调用write()方法,直到Buffer中已经没有尚未写入通道的字节。
读文件示例
1 | public static void nioReadFile(){ |
SocketChannel
Java NIO中的SocketChannel是一个连接到TCP网络套接字的通道。
使用
打开
可以通过以下2种方式创建SocketChannel:
打开一个SocketChannel并连接到互联网上的某台服务器:
1
2SocketChannel socketChannel = SocketChannel.open();
socketChannel.connect(new InetSocketAddress("127.0.0.1", 8081));一个新连接到达ServerSocketChannel时,会创建一个SocketChannel。
从 SocketChannel 读取数据
要从SocketChannel中读取数据,和FileChannel一样,需要结合Buffer使用,调用read()的方法。以下是例子:
1 | ByteBuffer buf = ByteBuffer.allocate(48); |
写入 SocketChannel
写数据到SocketChannel用的是SocketChannel.write()方法,该方法以一个Buffer作为参数。示例如下:
1 | String newData = "New String to write to file..." + System.currentTimeMillis(); |
关闭
1 | socketChannel.close(); |
非阻塞模式
NIO的强大功能部分来自于Channel的非阻塞特性,套接字的某些操作可能会无限期地阻塞。例如,对accept()方法的调用可能会因为等待一个客户端连接而阻塞;对read()方法的调用可能会因为没有数据可读而阻塞,直到连接的另一端传来新的数据。总的来说,创建/接收连接或读写数据等I/O调用,都可能无限期地阻塞等待,直到底层的网络实现发生了什么。慢速的,有损耗的网络,或仅仅是简单的网络故障都可能导致任意时间的延迟。然而不幸的是,在调用一个方法之前无法知道其是否阻塞。NIO的channel抽象的一个重要特征就是可以通过配置它的阻塞行为,以实现非阻塞式的信道。
1 | channel.configureBlocking(false) |
在非阻塞式信道上调用一个方法总是会立即返回。这种调用的返回值指示了所请求的操作完成的程度:
- 非阻塞模式下,write()方法在尚未写出任何内容时可能就返回了。所以需要在循环中调用write()。
- 非阻塞模式下,read()方法在尚未读取到任何数据时可能就返回了。所以需要关注它的int返回值,它会告诉你读取了多少字节。
- 在非阻塞模式下,调用connect(),该方法可能在连接建立之前就返回了。为了确定连接是否建立,可以调用
finishConnect()的方法。
非阻塞模式与选择器搭配会工作的更好,通过将一或多个SocketChannel注册到Selector,可以询问选择器哪个通道已经准备好了读取,写入等。
NIO客户端
1 | public static void client(){ |
ServerSocketChannel
Java NIO中的 ServerSocketChannel 是一个可以监听新进来的TCP连接的通道, 就像标准IO中的ServerSocket一样。
使用
打开 ServerSocketChannel
通过调用 ServerSocketChannel.open() 方法来打开ServerSocketChannel.如:
1 | ServerSocketChannel serverSocketChannel = ServerSocketChannel.open(); |
监听连接
通过 ServerSocketChannel.accept() 方法监听新进来的连接。当 accept()方法返回的时候,它返回一个包含新进来的连接的 SocketChannel。因此, accept()方法会一直阻塞到有新连接到达。
通常不会仅仅只监听一个连接,在while循环中调用 accept()方法. 如下面的例子:
1 | while(true){ |
ServerSocketChannel可以设置成非阻塞模式。在非阻塞模式下,accept() 方法会立刻返回,如果还没有新进来的连接,返回的将是null。 因此,需要检查返回的SocketChannel是否是null.如:
1 | ServerSocketChannel serverSocketChannel = ServerSocketChannel.open(); |
关闭 ServerSocketChannel
通过调用ServerSocketChannel.close() 方法来关闭
Selector
对于操作系统来说,线程之间上下文切换的开销很大,而且每个线程都要占用系统的一些资源(如内存)。Selector(选择器)能够检测一到多个NIO通道,并能够知晓通道是否为诸如读写事件做好准备的组件。一个单独的线程可以管理多个channel,从而管理多个网络连接。Selector类可以用于避免使用阻塞式客户端中很浪费资源的“忙等”方法。
用法
创建
1 | Selector selector = Selector.open(); |
向Selector注册通道
为了将Channel和Selector配合使用,必须将channel注册到selector上。通过SelectableChannel.register()方法来实现,如下:
1 | channel.configureBlocking(false); |
与Selector一起使用时,Channel必须处于非阻塞模式下。这意味着不能将FileChannel与Selector一起使用,因为FileChannel不能切换到非阻塞模式。而套接字通道都可以。
注意register()方法的第二个参数。这是一个“interest集合”,意思是在通过Selector监听Channel时对什么事件感兴趣。通道触发了一个事件意思是该事件已经就绪,可以监听四种不同类型的事件:
SelectionKey.OP_CONNECT: 某个channel成功连接到另一个服务器称为“连接就绪”SelectionKey.OP_ACCEPT:一个ServerSocketchannel准备好接收新进入的连接称为“接收就绪”。SelectionKey.OP_READ:一个有数据可读的通道可以说是“读就绪”。SelectionKey.OP_WRITE:等待写数据的通道可以说是“写就绪”。
如果你对不止一种事件感兴趣,那么可以用“位或”操作符将常量连接起来,如下:
1 | int interestSet = SelectionKey.OP_READ | SelectionKey.OP_WRITE; |
通过Selector选择通道
一旦向Selector注册了一或多个通道,就可以调用几个重载的select()方法。这些方法返回你所感兴趣的事件(如连接、接受、读或写)已经准备就绪的那些通道。换句话说,如果你对“读就绪”的通道感兴趣,select()方法会返回读事件已经就绪的那些通道。
- int select():阻塞到至少有一个通道在你注册的事件上就绪了。
- int select(long timeout):和select()一样,除了最长会阻塞timeout毫秒(参数)。
- int selectNow():不会阻塞,不管什么通道就绪都立刻返回
获取已选择键值
一旦调用了select()方法,并且返回值表明有一个或更多个通道就绪了,然后可以通过调用selector的selectedKeys()方法,访问“已选择键集(selected key set)”中的就绪通道。如下所示:
1 | Set selectedKeys = selector.selectedKeys(); |
当像Selector注册Channel时,Channel.register()方法会返回一个SelectionKey 对象。这个对象代表了注册到该Selector的通道(token)。可以通过SelectionKey的selectedKeySet()方法访问这些对象。
可以遍历这个已选择的键集合来访问就绪的通道。如下:
1 | Set selectedKeys = selector.selectedKeys(); |
这个循环遍历已选择键集中的每个键,并检测各个键所对应的通道的就绪事件。注意每次迭代末尾的keyIterator.remove()调用。Selector不会自己从已选择键集中移除SelectionKey实例。必须在处理完通道时自己移除,否则下次该通道变成就绪时,Selector会再次将其放入已选择键集中。
SelectionKey
当向Selector注册Channel时,register()方法会返回一个SelectionKey对象,代表SelectableChannel与Selector的注册的token。这个对象包含了一些属性:
- interest集合
- ready集合
- Channel
- Selector
- 附加的对象(可选)
interest
interest集合是你所选择的感兴趣的事件集合。可以通过SelectionKey读写interest集合,像这样:
1 | int interestSet = selectionKey.interestOps(); |
ready集合
ready 集合是通道已经准备就绪的操作的集合。在一次选择(Selection)之后,你会首先访问这个ready set。Selection将在下一小节进行解释。可以这样访问ready集合:
1 | int readySet = selectionKey.readyOps(); |
可以用像检测interest集合那样的方法,来检测channel中什么事件或操作已经就绪。但是,也可以使用以下四个方法,它们都会返回一个布尔类型:
1 | selectionKey.isAcceptable(); |
Channel、Selector
从SelectionKey访问对应的Channel和Selector很简单。如下:
1 | Channel channel = selectionKey.channel(); |
附加对象
可以将一个对象或者更多信息附着到SelectionKey上,这样就能方便的识别某个给定的通道。例如,可以附加 与通道一起使用的Buffer,或是包含聚集数据的某个对象。使用方法如下:
1 | selectionKey.attach(theObject); |
还可以在用register()方法向Selector注册Channel的时候附加对象。如:
1 | SelectionKey key = channel.register(selector, SelectionKey.OP_READ, theObject); |
示例
1 | public class ServerConnect |